| Pages:
1
2
3 |
jantie
Senior Member

Posts: 644
Registered: 6-12-2006
Location: Rotterdam NL
Member Is Offline
Mood: wind please!!
|
|
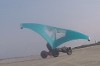
A full 4 minutes in Crab II at the end of this topic
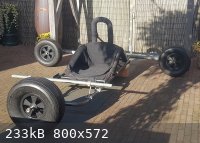
just for fun i'd like to build a different version of the Crab.
I'm gonna call it: 'Coast-line Cruiser'
this one is a mirrored version with the steering axle in the back.
therefore when you ride it the single front wheel will probably not be visible for the rider because of the footboard.
so this might give the feeling of low flying because of that.
and the goal of a better trailing because 2 steering wheel can easelly give friction and therefore cause speed reduction wich Crab 1 has slightly. not
much, but slightly.... and if i can reduce that.. 
maybe the weight disrtribution with this setup will give a better
result and easyer high speeds, also the goal of weight reduction is a priority.
this version is allready made by more guys so i am not taking any credit for the idea..
keep you posted

|
|
|
RedSky
Posting Freak
Posts: 1767
Registered: 7-9-2009
Member Is Offline
|
|
I like this 
Excuse my lack of knowledge but might it be easier to use the single front wheel for steering ?
edit - I think I see the mistake in my suggestion above. You'd be going around in circles. :D |
|
|
jantie
Senior Member
Posts: 644
Registered: 6-12-2006
Location: Rotterdam NL
Member Is Offline
Mood: wind please!!
|
|
Quote: Originally posted by RedSky  | I like this
Excuse my lack of knowledge but might it be easier to use the single front wheel for steering ?
edit - I think I see the mistake in my suggestion above. You'd be going around in circles. :D |
:D:D:D
The other way around in fact, I will not be able to steer at all..
But keep coming with input, comments or suggestions.
I'm only human and can also easily miss something...
|
|
|
Juan
Member
Posts: 374
Registered: 13-2-2016
Location: Germany
Member Is Offline
|
|
Interesting idea |
|
|
RedSky
Posting Freak
Posts: 1767
Registered: 7-9-2009
Member Is Offline
|
|
|
|
|
khaakon
Member
Posts: 119
Registered: 4-3-2015
Location: Oslo, Norway
Member Is Offline
Mood: In one of his moods, again..
|
|
I'm just curious, why the curved backaxle?
Driving characteristics? Weight distribution (edit: surely not?)? Forces/stiffness in the buggy? Shorter steering rods? Or ...?
I've been following your absolutely fabolous work on the Crab - really impressed and amused, lovely project!
# Flysurfer Peak 4 @4/5/6/8/11/13m -FS Connect bars # FS Peak 5 @2,5/6/8m -FS
Connect II bars # FS Peak 6@ 2,5/11m
# Core Sensor 4 pro bar/18m lines +rope-slider, for any/all kites
# Flysurfer Speed 5 @9m # Ozone Subzero @7m
# Ozone Ignition @2.5m trainerkite
# Sysmic S3 buggy # Black Crows skis
# Underwave Atlantis seat harness, DIY spreader Dyneema rope, no hook # POC
helmet & G-Form pads
# DJI Mini3 pro Drone
|
|
|
jantie
Senior Member
Posts: 644
Registered: 6-12-2006
Location: Rotterdam NL
Member Is Offline
Mood: wind please!!
|
|
thanks Khaakon,
the reasons for a curved axle are:
1#
it's something else than just a straight pipe and bend ant the end on both sides.
and it needs to be bend because of clearence for the tires that are in line instead of a 90 degrees angle like a 'normal' buggy because they need room
to steer.
2#
i'm probably going for a 50mm pipe so it will be rigid enough and no further stiffening is needed.
i'm trying to make the steering and the rest of this creation as light as possible.
Crab 1 is kinda heavy, and the weight distribution is not perfect.
when i get lifted only the rearwheel get's airtime,but in my 'normal' buggy all 3 go 'up and away..'
:D:D
and when starting to drift a little but equally with three wheel in line costs less speed.
So this rear-steer setup hopefully also translates in a better allignment when i ride this new creation a little overpowerd. because there are 2
wheels that steer instead of 1, there are always 2 wheels that might drift wich causes decrease in speed.
with making that better i try to prevent that.
important: I do not want to make a copy of Crab 1
everything and every part if possible is gonna be reversed, up-side-down, mirrored or completely different.
so far i've got the tires, rims, a lot of nuts and bolds left from previous projects.
i've calculated that the radius has to be about the same as the length of the steering axle,
now finding a way or someone who can do that nicely.
for the footboard on the Coastline Cruiseri've got also a nice and different idea..
keep you posted when progress is made..
|
|
|
Pablo
Posting Freak
Posts: 1453
Registered: 22-10-2005
Location: Vancouver, BC
Member Is Offline
Mood: Stoked
|
|
Looks interesting, my only concern is the possibility of cutting hard and loading up the buggy and lines. Do you figure the setup will be stable
enough to not tip over the front corner?
I only ask this because even in my nice stable buggy, with the right beach conditions and enough power it has a tendency to try and pull the whole
buggy over the front corner. Look up the Reliant Robin or old ATV footage, companies have all switched to two tires in front, one in the back to avoid
this same tuck and roll. The crab is moving sideways though, so not sure if this would apply.
Sysmic S1 Buggy.
0.7m / 1.4m / 2.0m PKD Buster I
4.4m PKD Buster
10m JoJo RM+
6m Flysurfer Outlaw
12m Ozone Access
|
|
|
jantie
Senior Member
Posts: 644
Registered: 6-12-2006
Location: Rotterdam NL
Member Is Offline
Mood: wind please!!
|
|
@ Pablo
Crab 1 has been thoroughly thrown around on rough and flat sandy surfaces and the only time a tire
lifted was the rear one when driving really overpowerd.
it's gonna be a trial-and-error story.
in my normal buggy i also had some exits and tip-overs in the past, mostly due to lack of experience.
now after well over 17000 miles i know what and how to but more importantly what not to do to prevent an OBE.
:wee:
|
|
|
jantie
Senior Member
Posts: 644
Registered: 6-12-2006
Location: Rotterdam NL
Member Is Offline
Mood: wind please!!
|
|
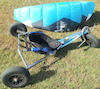
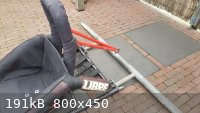
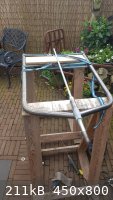
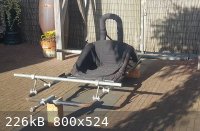
the setup to paint a picture in realtime of how it's gonna be:
the middlesection (seat) is a part of Crab I.
i'm using it without modifying so it's compatible for both Crabbies.


steel is ordered so now wait for the phone to ring..
that's it for now.
|
|
|
RedSky
Posting Freak
Posts: 1767
Registered: 7-9-2009
Member Is Offline
|
|
This type of crab makes more sense with less drag from two wheel steer. Maybe also include an optional fork and rear axle kit to convert from crab to
regular buggy.
|
|
|
Randy
Posting Freak
Posts: 1908
Registered: 20-5-2014
Member Is Offline
|
|
It is going to be fun watching this take shape! Keep posting the pics as you go.
NPW Test Pilot -US99
|
|
|
jantie
Senior Member
Posts: 644
Registered: 6-12-2006
Location: Rotterdam NL
Member Is Offline
Mood: wind please!!
|
|
| Quote: Originally posted by RedSky |
This type of crab makes more sense with less drag from two wheel steer. Maybe also include an optional fork and rear axle kit to convert from crab to
regular buggy. |
it hopefully does have less drag but time will tel..
and as for a conversion-kit:
i already have a 'normal' buggy so there is no need for that
:D

15 years old and well over 26000 km on it..
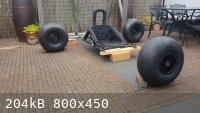
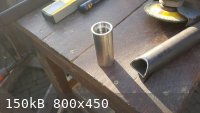
today's progress is small but better than nothing:
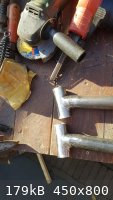
found leftover material wich is perfect for the ballbearing head's to hold the upright's:
it's stainless steel and even better: it's for free..!!
my uncle has a steel Lathe/miller to make the bearings fit perfectly.
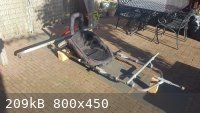
this is the rear-end from crab I wich will be multifuncional:

this part can be removed:
and now it's also suitable for the Cruizer.
fortunatly the supports for the roll-bar can also be used
so i don't have to make that double.

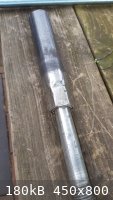
at both ends the axle (50mm) will be extendend with 1 size smaller (42mm) pipe wich will be bend in a 70 degrees angle inward.
so not a complete curved axle but that was gonna be to costly..
and this rear-axle was the one that was used to widen and extend the original Libre V-max this buggy was before i converted into Crab I
so that's it for now..
|
|
|
Randy
Posting Freak
Posts: 1908
Registered: 20-5-2014
Member Is Offline
|
|
Imagineering at its best!
NPW Test Pilot -US99
|
|
|
jantie
Senior Member
Posts: 644
Registered: 6-12-2006
Location: Rotterdam NL
Member Is Offline
Mood: wind please!!
|
|
Thanks Randy
|
|
|
jantie
Senior Member
Posts: 644
Registered: 6-12-2006
Location: Rotterdam NL
Member Is Offline
Mood: wind please!!
|
|
|
|
|
RedSky
Posting Freak
Posts: 1767
Registered: 7-9-2009
Member Is Offline
|
|
Randy is right. I do admire people who can do this kinda stuff.
Is the translation you're looking for, a bearing press ? |
|
|
jantie
Senior Member
Posts: 644
Registered: 6-12-2006
Location: Rotterdam NL
Member Is Offline
Mood: wind please!!
|
|
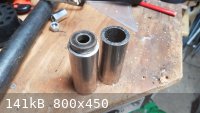
this is what i mean...
 edit:
edit: translated from dutch (draai- en freesbank) Lathe and milling machine
|
|
|
RedSky
Posting Freak
Posts: 1767
Registered: 7-9-2009
Member Is Offline
|
|
Looks like a lathe of some kind.
|
|
|
jantie
Senior Member
Posts: 644
Registered: 6-12-2006
Location: Rotterdam NL
Member Is Offline
Mood: wind please!!
|
|
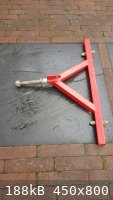
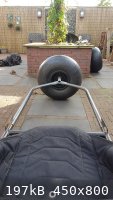
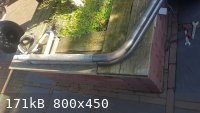
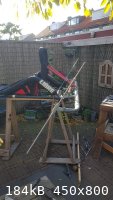
today continued on the frontside of the frame:
setup
locked in and set level
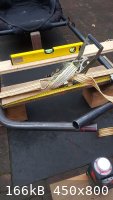
used a laser to be more accurate

result after the cut
setting the axle-pipe
the frontframe in total is still to long
but that will come on a further stage

result so far..
wheelbolt not welded yet but looks great if i may say so

to be continued...
:D:D
|
|
|
RedSky
Posting Freak
Posts: 1767
Registered: 7-9-2009
Member Is Offline
|
|
My first thought, why did he weld table and chairs to the buggy seat. :duh:
|
|
|
jantie
Senior Member
Posts: 644
Registered: 6-12-2006
Location: Rotterdam NL
Member Is Offline
Mood: wind please!!
|
|
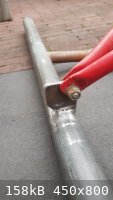
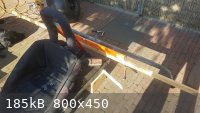
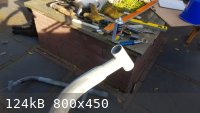
unexpected dry wheater today
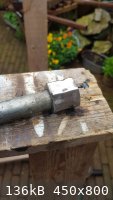
fixed the frontwheel axle to the frame:
first i took a M20 nut, shaved the thread
and slided it over a M20 bolt,
grinded a groove

welded it

grinding an sanding
aligned it

again welding
alignment on the frame
welding

grinded, sanded and painted
drivers view.
slowly getting there...

that's it for now.
|
|
|
Randy
Posting Freak
Posts: 1908
Registered: 20-5-2014
Member Is Offline
|
|
Seems like you have done a lot.
NPW Test Pilot -US99
|
|
|
RedSky
Posting Freak
Posts: 1767
Registered: 7-9-2009
Member Is Offline
|
|
Seems to me at least, a little more intuitive to have the single wheel facing rider. This is going to be great! |
|
|
jantie
Senior Member
Posts: 644
Registered: 6-12-2006
Location: Rotterdam NL
Member Is Offline
Mood: wind please!!
|
|
|
|
|
jantie
Senior Member
Posts: 644
Registered: 6-12-2006
Location: Rotterdam NL
Member Is Offline
Mood: wind please!!
|
|
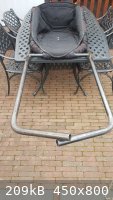
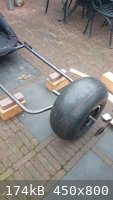
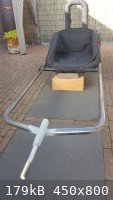
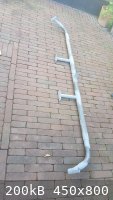
continued with the rear-axle:
made 4 incisions in the bended piece 0f 40mm so it would fit (with a hammer) in the 50 mm pipe


times 2..
allignment on the complete frame
after welding, grinding, sanding and spray-paint
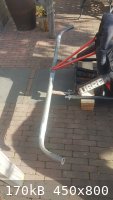
rideheight made for these tires to be used on a really smooth beach,
bigfoots will give more rideheight in case of a bumpy surface.

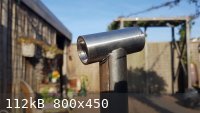
and got these back from my uncle,
ready to be welded on the steeringaxle
 next time:
uprights en steeringrods
goal is first test-run in december
|
|
|
Randy
Posting Freak
Posts: 1908
Registered: 20-5-2014
Member Is Offline
|
|
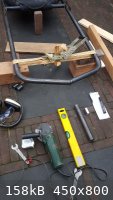
Thanks for showing the latest. If it no too difficult, it would be interesting to see the tools you are using in this sometime. I'm thinking you are
using quite a lot of special tools and equipment.
NPW Test Pilot -US99
|
|
|
abkayak
Posting Freak
Posts: 2273
Registered: 7-1-2012
Location: a.b. NY
Member Is Offline
Mood: loving life and becoming wise in simplicity
|
|
jantie...you would make a fantastic neighbor
US-31...Cquad set/ 2.5 Bullet/ 2.6 Viper/ 2.9m Reactor/ 2- 3.5m Bullet/ 3.6 Beamer/ 4m Buster/ 4m Toxic/ 4m Ikon dp/ 4.5 Bullet/ 4.9m Blade/ 5.6
Twister/ 6.6m Blade/ 7.5 Apex/ 9m Fuel/ Phantom I 9,12,15,18/ 2 Flexibugs/ PL Big Foot/ landboards
|
|
|
jantie
Senior Member
Posts: 644
Registered: 6-12-2006
Location: Rotterdam NL
Member Is Offline
Mood: wind please!!
|
|
progress of yesterday:
made a drawing to see an calculate the angle of the bearinghead.
It's almost similar to the one of the Spider Crabbuggy, but he use a bigger tire and another rim.

draw and grinding it fit.
welding and more grinding.
cutting the 40mm to make the 34mm pipe fit


after measuring and setting it level in every direction,
ofcourse also a visual allignment...
again welding, grinding and some spray-paint
the complete axle
and the answer to Randy's question:
most of them are the cheapest DIY-tools here in NL.
only thing missing is a XL pipe-bender and the Lathe/milling machine to make the ball-bearingheads.

And thanks Abkayak, I'll take that as a compliment.. :D
|
|
|
rtz
Posting Freak
Posts: 1107
Registered: 12-10-2010
Location: Edmond, OK
Member Is Offline
|
|
I don't have a lathe yet either. The first head tube I made; I bored out the bearing pocket using one of these adjustable boring heads. Works but slow
to do.
https://www.ebay.com/itm/333725651886
I've since made them like Popeye did and slit the tube to put it inside another. In the future I might just use flanged bearings.
Sting 1.7, 2.4 - Flow 2, 3, 4, 5 - Reactor 2.2, 2.8, 3.5, 4.4, 5.5 - Yakuza 2.2, 2.7 - JOJO 9
|
|
|
| Pages:
1
2
3 |