| Pages:
1
2
3 |
jantie
Posts: 644
Registered: 12-6-2006
Location: Rotterdam NL
Member Is Offline
Mood: wind please!!
|
|

looking good..!!
|
|
|
Jack.Oh
Posts: 184
Registered: 4-12-2019
Location: Aurora, Oh
Member Is Offline
|
|
I now am trying to figure out how to hold everything square.
I made a fixture from things I had around the garage. It is lining up Ok.
I still need to trim the back of the rails a bit. The one on the right side is not angled correctly.
I am hoping to finish up this week. Then I will need to figure out the fork.
Thanks for looking.
US417
Custom buggy "Zephyr II"
Pansh A15 9m, 12m, 15m
Pansh Genesis 4m, 6m
|
|
|
Jack.Oh
Posts: 184
Registered: 4-12-2019
Location: Aurora, Oh
Member Is Offline
|
|
Ok, here is more progress. I was unhappy with the way the fixture was holding the buggy parts. So, I decided to change a few things... Now, I did not
want to spend money on a fixture that probably will only be used one time.  (we'll see) Anyway, here is what I came up with after scavenging some parts which have been laying around my garage and at work. (we'll see) Anyway, here is what I came up with after scavenging some parts which have been laying around my garage and at work.
  
US417
Custom buggy "Zephyr II"
Pansh A15 9m, 12m, 15m
Pansh Genesis 4m, 6m
|
|
|
Jack.Oh
Posts: 184
Registered: 4-12-2019
Location: Aurora, Oh
Member Is Offline
|
|
Here are the parts loaded into the fixture.
US417
Custom buggy "Zephyr II"
Pansh A15 9m, 12m, 15m
Pansh Genesis 4m, 6m
|
|
|
Jack.Oh
Posts: 184
Registered: 4-12-2019
Location: Aurora, Oh
Member Is Offline
|
|
After welding the side rails, I borrowed the seat from my other buggy just to see what it would look like.


US417
Custom buggy "Zephyr II"
Pansh A15 9m, 12m, 15m
Pansh Genesis 4m, 6m
|
|
|
eric67m
Posts: 543
Registered: 9-11-2015
Location: Monroe, Washington
Member Is Offline
|
|
Looking good. It's fun to see your progress and what you use for holding everything in place. Keep your fixtures or good photos for when you build
your next one. N+1
Flying A mixed quiver of Flysurfer Peak kites.
Rollin in the Popeye The Welder Playa buggy.
|
|
|
rtz
Posts: 1107
Registered: 10-12-2010
Location: Edmond, OK
Member Is Offline
|
|
Looks awesome. I like the look of the wide axle and those tires.
Where did you source the wheels or what is their standard application?
Sting 1.7, 2.4 - Flow 2, 3, 4, 5 - Reactor 2.2, 2.8, 3.5, 4.4, 5.5 - Yakuza 2.2, 2.7 - JOJO 9
|
|
|
Jack.Oh
Posts: 184
Registered: 4-12-2019
Location: Aurora, Oh
Member Is Offline
|
|
Thanks all for the encouraging words.
The rims are....
https://www.bmikarts.com/8-x-7-Rim-with-Bead-Lock-_p_10510.h...
The bearings....
https://www.ebay.com/itm/6304LLUNR-NTN-Standard-Small-Ball-B...
If you are willing to go with a 25mm or a 3/4" axle you can find the bearings for less. I really wanted to stay in the kite buggy "standard".
Which seems to be 20mm axles.
The tires are....
Carlisle Straight Rib Lawn & Garden Tire - 18X9.50-8 4 ply...
I think I got them on Amazon.
It was really difficult to put the tires on the rims. I had help from my sons (Kyle and Tyler). I could not have done it alone.
US417
Custom buggy "Zephyr II"
Pansh A15 9m, 12m, 15m
Pansh Genesis 4m, 6m
|
|
|
Jack.Oh
Posts: 184
Registered: 4-12-2019
Location: Aurora, Oh
Member Is Offline
|
|
Quote: Originally posted by rtz  | Looks awesome. I like the look of the wide axle and those tires.
Where did you source the wheels or what is their standard application? |
It's funny you should mention that. Because the tire size is what started this whole build. I saw Claude's VTT Black Widow at the Wildwood Buggy Bash
last fall with this size tires on it. The tires were mounted on a wider rim, I think the rims were an 8 x 8 Sysmic. Well to buy Sysmic was a lot of
$$$ with shipping. Then I found these rims, I was originally thinking of putting them on my custom Flexi wide axle.
(http://www.powerkiteforum.com/viewthread.php?tid=36640)
But the buggy would have been too high up. So, I finished that build with Midi tires. And made the decision to build from scratch.
US417
Custom buggy "Zephyr II"
Pansh A15 9m, 12m, 15m
Pansh Genesis 4m, 6m
|
|
|
jantie
Posts: 644
Registered: 12-6-2006
Location: Rotterdam NL
Member Is Offline
Mood: wind please!!
|
|
Looking very good so far.
When you finished it, how are you going to treat it?
Galvanized or powder coating or....?
|
|
|
Jack.Oh
Posts: 184
Registered: 4-12-2019
Location: Aurora, Oh
Member Is Offline
|
|
| Quote: Originally posted by jantie | Looking very good so far.
When you finished it, how are you going to treat it?
Galvanized or powder coating or....? |
Thank you...
As far as finishing I am not sure yet. I was thinking of primer and paint.
One of the main reasons for paint is... I am not sure if I will need to change some thing, make any adjustments, new parts, or modify existing parts.
So, paint will make it easy to strip / repaint and mach parts.
US417
Custom buggy "Zephyr II"
Pansh A15 9m, 12m, 15m
Pansh Genesis 4m, 6m
|
|
|
eric67m
Posts: 543
Registered: 9-11-2015
Location: Monroe, Washington
Member Is Offline
|
|
This exists. I have never used it. It is a generic version of "steel-it" a weld through paint.
https://www.amazon.com/Stainless-Steel-Protective-Spray-Pain...
Flying A mixed quiver of Flysurfer Peak kites.
Rollin in the Popeye The Welder Playa buggy.
|
|
|
Jack.Oh
Posts: 184
Registered: 4-12-2019
Location: Aurora, Oh
Member Is Offline
|
|
Thanks for the link. I think this might be a good option.
US417
Custom buggy "Zephyr II"
Pansh A15 9m, 12m, 15m
Pansh Genesis 4m, 6m
|
|
|
Jack.Oh
Posts: 184
Registered: 4-12-2019
Location: Aurora, Oh
Member Is Offline
|
|
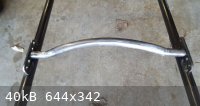
Ok, started working on the front fork. I did not have a final design in mind. So, I did not put anything on paper, just started working to see where
it was going to end up. I knew I wanted some adjustment in the fork for trail and for the foot pegs. With that in mind here is what I have so far. It
is only tacked together at the axle plate and at the foot peg plate, the rest is still loose. If anyone is interested, I can get some measurements and
post them.
  
US417
Custom buggy "Zephyr II"
Pansh A15 9m, 12m, 15m
Pansh Genesis 4m, 6m
|
|
|
jantie
Posts: 644
Registered: 12-6-2006
Location: Rotterdam NL
Member Is Offline
Mood: wind please!!
|
|
Nice...!!!!!!!!
Looking forward to the end result.
|
|
|
ColinW
Posts: 243
Registered: 4-12-2015
Location: Victoria BC
Member Is Offline
|
|
I like the curved fork tube surrounding the axle mounting plates. Looks good and stiff for speed.
I am slowly cleaning my garage back to the corner where the welder is buried. I keep discovering little projects on the way. Even though I am going
back to work, I hope to keep this project in sight.
|
|
|
Jack.Oh
Posts: 184
Registered: 4-12-2019
Location: Aurora, Oh
Member Is Offline
|
|
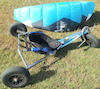
Ok here is this weeks progress.
I tacked the fork together. And I made a back rest. The back rest is not my design. I found a YouTube video by Popeye the Welder, the back rest turned
out nice. Thank you Popeye for your contributions.
So, then I put the seat on again and sat in it. It was really flexi... the side rails 1.25 tube .125 thick still really bouncy??? I could not let that
go. I am a bigger guy, and it felt like it would not hold up with me riding in it. So, I made struts to stiffen the rails. At this point all is tacked
into place and the buggy will stand on it's own, with out any supports.
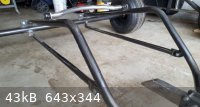  
Things left to do..... Finish the foot pegs, finish welding, paint, make seat, make side rail covers, and bag.
US417
Custom buggy "Zephyr II"
Pansh A15 9m, 12m, 15m
Pansh Genesis 4m, 6m
|
|
|
Jack.Oh
Posts: 184
Registered: 4-12-2019
Location: Aurora, Oh
Member Is Offline
|
|
Foot pegs....
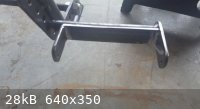 
I was hoping to finish all welding/grinding this weekend but I ran out of welding wire. Hoping to finish up in the next few weeks.
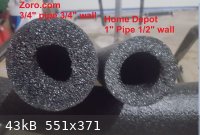
Also, I found this to use as padding..
https://www.zoro.com/tundra-pipe-ins-poly-1-18-in-id-6-ft-6x...
This insulation is 3/4" wall, the center is to size and it is more firm then the stuff at Home Depot.
Here is a side by side.
US417
Custom buggy "Zephyr II"
Pansh A15 9m, 12m, 15m
Pansh Genesis 4m, 6m
|
|
|
jantie
Posts: 644
Registered: 12-6-2006
Location: Rotterdam NL
Member Is Offline
Mood: wind please!!
|
|
|
|
|
Jack.Oh
Posts: 184
Registered: 4-12-2019
Location: Aurora, Oh
Member Is Offline
|
|
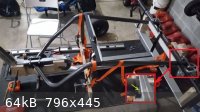
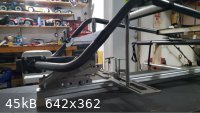
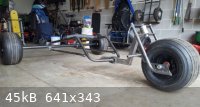
OK, Jacks back......
It has been a while since I had any time to work on my buggy.
This week I finally got some time in.
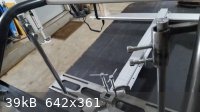
Here is the long story... Finished the front fork.
 If you notice, I put supports in in the middle. Once I did that I could not take the fork of the Swan Neck. The wall of the yolk was a bit taller
then the bearing. Both on top and bottom. Here is a picture hopefully you can see what I mean. To get the fork off, I had to grind the top and bottom
of the yolk. If you notice, I put supports in in the middle. Once I did that I could not take the fork of the Swan Neck. The wall of the yolk was a bit taller
then the bearing. Both on top and bottom. Here is a picture hopefully you can see what I mean. To get the fork off, I had to grind the top and bottom
of the yolk.

Now, I also noted that the bottom tube of the swan neck was a bit too long, about 4 inches.
So, I ground the top and bottom of the yolk, shortened the bottom tube, and I added a sleeve in. The sleeve will, down the road, give me a place to
tie / hook off an AQR. Here are a couple pics.
  
US417
Custom buggy "Zephyr II"
Pansh A15 9m, 12m, 15m
Pansh Genesis 4m, 6m
|
|
|
Jack.Oh
Posts: 184
Registered: 4-12-2019
Location: Aurora, Oh
Member Is Offline
|
|
Next up, I will be making some wheel spacers. As rtz pointed out they are needed and are not optional. And really it is not that much work to make
them. Thanks for setting me on the right path.
US417
Custom buggy "Zephyr II"
Pansh A15 9m, 12m, 15m
Pansh Genesis 4m, 6m
|
|
|
eric67m
Posts: 543
Registered: 9-11-2015
Location: Monroe, Washington
Member Is Offline
|
|
I like your pierced bottom of the swan neck. I have had my rope slide off of the rod that it is tied around. Good thinking.
Flying A mixed quiver of Flysurfer Peak kites.
Rollin in the Popeye The Welder Playa buggy.
|
|
|
Windstruck
Posts: 3339
Registered: 5-16-2015
Location: St George, UT, USA
Member Is Offline
Mood: Get in my buggy!
|
|
Completely agree with Eric - I've had to come up with several work around solutions to keep my AQR webbing from sliding off the stinger and this would
be a nice solution.
Born-Kites:
RaceStar+ (3.0m, 5.0m, 7.0m, 9.0m, 14.0m)
RaceStar (9.0m, 11.0m)
NasaStar-4 (2.5m, 4.0m, 5.5m, 7.0m)
NasaStar-3 (custom 3.2m)
Flysurfer Kites:
Peak-5 (2.5m)
Buggy:
Peter Lynn BigFoot+ nose & tail; midsection VTT rail & seat kit; home-brewed AQR
NAPKA Member US2815
SWATK Member UT0003
|
|
|
eric67m
Posts: 543
Registered: 9-11-2015
Location: Monroe, Washington
Member Is Offline
|
|
This also means your swan neck needs to extend back underneath you. I don't believe I have space to fit a tube or a wedge section of a tube. Other
people's buggies will vary...
Flying A mixed quiver of Flysurfer Peak kites.
Rollin in the Popeye The Welder Playa buggy.
|
|
|
Jack.Oh
Posts: 184
Registered: 4-12-2019
Location: Aurora, Oh
Member Is Offline
|
|
I have not used an AQR system. I am actually still getting comfortable with using a harness with my power kites. I have a homemade harness and a PL
Divine. The swan neck extends about two inches into the seating area when the buggy is adjusted for me. That puts the thru hole just in front of me. I
will put a grommet around the front area of the seat to allow for access. I know the object is to get as close to the release point as possible. Well
if it dose not work having the sleeved hole there wont effect anything.
US417
Custom buggy "Zephyr II"
Pansh A15 9m, 12m, 15m
Pansh Genesis 4m, 6m
|
|
|
Windstruck
Posts: 3339
Registered: 5-16-2015
Location: St George, UT, USA
Member Is Offline
Mood: Get in my buggy!
|
|
| Quote: Originally posted by Jack.Oh | | I have not used an AQR system. I am actually still getting comfortable with using a harness with my power kites. I have a homemade harness and a PL
Divine. The swan neck extends about two inches into the seating area when the buggy is adjusted for me. That puts the thru hole just in front of me. I
will put a grommet around the front area of the seat to allow for access. I know the object is to get as close to the release point as possible. Well
if it dose not work having the sleeved hole there wont effect anything. |
The extra hole may come into play when attempting to set a PB. 
Born-Kites:
RaceStar+ (3.0m, 5.0m, 7.0m, 9.0m, 14.0m)
RaceStar (9.0m, 11.0m)
NasaStar-4 (2.5m, 4.0m, 5.5m, 7.0m)
NasaStar-3 (custom 3.2m)
Flysurfer Kites:
Peak-5 (2.5m)
Buggy:
Peter Lynn BigFoot+ nose & tail; midsection VTT rail & seat kit; home-brewed AQR
NAPKA Member US2815
SWATK Member UT0003
|
|
|
RedSky
Posts: 1743
Registered: 9-7-2009
Member Is Offline
|
|
Anyone else have a fetish for new tyres with spikes or just me ? Great build.
|
|
|
Jack.Oh
Posts: 184
Registered: 4-12-2019
Location: Aurora, Oh
Member Is Offline
|
|
| Quote: Originally posted by Windstruck | | Quote: Originally posted by Jack.Oh | | I have not used an AQR system. I am actually still getting comfortable with using a harness with my power kites. I have a homemade harness and a PL
Divine. The swan neck extends about two inches into the seating area when the buggy is adjusted for me. That puts the thru hole just in front of me. I
will put a grommet around the front area of the seat to allow for access. I know the object is to get as close to the release point as possible. Well
if it dose not work having the sleeved hole there wont effect anything. |
The extra hole may come into play when attempting to set a PB.
|
And brown pants
US417
Custom buggy "Zephyr II"
Pansh A15 9m, 12m, 15m
Pansh Genesis 4m, 6m
|
|
|
Jack.Oh
Posts: 184
Registered: 4-12-2019
Location: Aurora, Oh
Member Is Offline
|
|
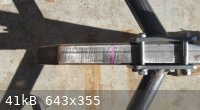
Time to make wheel spacers...
Look at them spikes .... 

Thanks!
US417
Custom buggy "Zephyr II"
Pansh A15 9m, 12m, 15m
Pansh Genesis 4m, 6m
|
|
|
Jack.Oh
Posts: 184
Registered: 4-12-2019
Location: Aurora, Oh
Member Is Offline
|
|
Ok, I am sure that all of you people here know about wheel spacers.
This is just the next step to the build. I am using 1" steel tube /.083" wall, this was left over from a fork I made for my other buggy. (pic above)
First take the bearings out, setup a flat surface, place the wheel on it, and measure the hub. It measures 3.250".
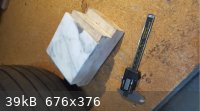  
Next, setup the bearing, measure it and do some math.
 
Hub - Bearing seat times two = Spacer length
3.250-(.450x2)=2.350
I do not have a mill or a lath so sawzall and a belt sander.
 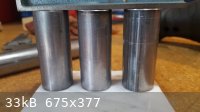
Job Done!
US417
Custom buggy "Zephyr II"
Pansh A15 9m, 12m, 15m
Pansh Genesis 4m, 6m
|
|
|
| Pages:
1
2
3 |