rtz
Posts: 1106
Registered: 10-12-2010
Location: Edmond, OK
Member Is Offline
|
|
Buggy Building
If you`ve ever wanted to build one and haven`t; you just have to dive in and do it. Plenty of great youtube videos on welding. Get some extra metal
of the type you plan on using. Chop it up and practice joining it together. Weld two pieces together and hammer it over to gauge the strength of the
weld. Take a metal cutting bandsaw and saw through the weld and examine it. That`s how I got my machine dialed in. Also the chart with the starting
settings on the door of the machine. Weld with the recommended settings; then try the setting above and below that. Then you will know what it's
like when the settings are not correct.
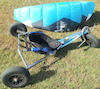
I've wanted some different(higher) side rails for a long time. Finally dropped the $90 on the pipe bender.
A bit daunting at first; but you just have to make that first bend. Now that I have bent some pipe; if I do up another set; I won`t have any
hesitation and will be more callous about throwing some pipe in there and bending it up. Nothing to it.


(and yes; I have to use a ` in the place of the correct punctuation mark in order for a post to show at all. Pretty sure the text input situation
with the forum is killing the forum because people can't post and don't know why. When you click post or preview and your post is blank.. Real
downer when that giant post disappears for good. Only took once and now I copy the post to the clipboard before proceeding. I dumped windoze long
ago. Both Apple desktop and mobile are no go in getting a post to appear with a apostrophe.)
Sting 1.7, 2.4 - Flow 2, 3, 4, 5 - Reactor 2.2, 2.8, 3.5, 4.4, 5.5 - Yakuza 2.2, 2.7 - JOJO 9
|
|
|
Chook
Posts: 141
Registered: 10-25-2009
Location: Esperance Western Australia
Member Is Offline
Mood: I work at home from 8.00am to 12 knots
|
|
Nice work!!!
I see you changed the angle of the 2 plates to swan neck connection. This is a tricky area to set up with an angled downtube on the swan neck, as if
you change the length of the buggy the ground clearance/seat angle alters.
I prefer a back rest on my buggys for long distance cruising and I'm getting on in years.
Built 5 buggys so far and own 2x Sysmic 2's. One on Midi XL tyres and I use the 12" wide Beach racers on my local beaches with my other Sysmic.
A great way to get the bends correct and the same on both rails is to measure down from the top of the frame of the pipe bender to the die (while it's
still under pressure you can eyeball across the top plates of the bender and see the measurement on the ruler that's end is resting against the die)
with a steel rule or caliper and use that measurement on both side rails. This way you can remove it and redo it again if it's not enough, as you have
an original reference (even if it's only a rough one)
Great for making repetitive bends all the same, as the same measurement makes it a simple job to achieve the exact angle every time and allowing for
the springback in the material.
This works a treat on thin tube too.
https://www.youtube.com/watch?v=ZlSnVSrWg0M&feature=rela...
For smaller tubes I tape one end fill it with water and freeze it and then it can be bent round a mandrel with out any collapse of the tube.
PS; I love your method of tyre removal too!!!!
Modified Sysmic S2 Buggys
7m R1
8m R1 2
11m R1
15m R1
15m Chrono 2
18m Chrono
18m ELF
|
|
|
rtz
Posts: 1106
Registered: 10-12-2010
Location: Edmond, OK
Member Is Offline
|
|
Oh yeah(cut tire). That one got poked through from a thorn. I needed a piece for my random adapter. Fed through the bandsaw no problem.
This buggy started out as the current model PL. Only thing left is the axle. Got my carbon fiber tube.
That is why it has the funky side plate angle.
Started out just making a longer downtube. Then a wider fork. Now the side rails with the replacement seat. Carbon axle next.
Sting 1.7, 2.4 - Flow 2, 3, 4, 5 - Reactor 2.2, 2.8, 3.5, 4.4, 5.5 - Yakuza 2.2, 2.7 - JOJO 9
|
|
|
rtz
Posts: 1106
Registered: 10-12-2010
Location: Edmond, OK
Member Is Offline
|
|
Still looking for some cleaver ways to do a clamp on back rest.

Sting 1.7, 2.4 - Flow 2, 3, 4, 5 - Reactor 2.2, 2.8, 3.5, 4.4, 5.5 - Yakuza 2.2, 2.7 - JOJO 9
|
|
|
kteguru
Posts: 807
Registered: 3-15-2009
Member Is Offline
|
|
Nice job on the buggy
I didn't know about the problems you mentioned regarding posting. I just thought everyone opted to use faceplace and mybook and all that. I remember
when 3 pages a day under 'todays posts' was common. Now 3 posts is the norm. Sad 
Let us know how the first test ride goes
|
|
|
adambweird
Posts: 168
Registered: 9-1-2016
Location: NW Ohio
Member Is Offline
|
|
If youre a rookie with a mig welder, when your settings are right, it should sound like bacon sizzling when youre running. Theres a LOT more to it
than just that, but its a great tip for rookies, lol.
HQ: Symphony Beach 1.3, 2.2.4, Crossfire II 5m, Apex II 5m
Peter Lynn: Pepper II 3m, Venom II 13M
Born: NS3 4m, 7m. NS2 5.5m
|
|
|
soliver
Posts: 3913
Registered: 12-15-2011
Location: somewhere, far, far away
Member Is Offline
Mood: sleepy
|
|
Great looking bug rtz!... nice work!!!
I'm going to take a nap now
|
|
|