Who says you can't have bigfoot tires on a Flexi? I got this idea from a guy in UK. I added the kinked downtube instead of the straight one he used.
I took my wide axle Flexi bug and replaced the downtube and front fork with Peter Lynn Bigfoot parts. The rear tires and wheels are also direct bolt
on items if you get the 12mm bearings. Angus at Coastal Wind Sports made sure I had all the little bits necessary to make the conversion.
I had no idea but these tires have a max inflation of 5 psi! I'm sure you could drop them right on down to let them roll over the really soft sand I
frequently find myself on at various beaches. With these tires the little bumps in the field I usually ride in almost disappear. The slides are a
little less direct but somehow easier to modulate.
Of course, I still have the std Flexi parts for those times when its smooth and only hard sand everywhere.
Here are a few pics of it but they really don't do justice to just how huge this thing is. Next time out I will shorten the downtube slightly to
enhance my reach to the pegs in the turns. The long setup would be perfect for park and rides up and down the beach but for short course stuff I want
a little more leg reach.
looks great, make sure you keep an eye out on the welding on the fork and specially the bridge were hair line crack will forum just to the left or
right on the hole, from hard riding ...
add an extra gusset and enjoy riding over everything and say hello to soft sand riding:wee:BeamerBob - 9-3-2009 at 06:27 AM
Do you mean the topmost arch or the support brace underneath?PHREERIDER - 9-3-2009 at 09:01 AM
you're set with those big tires
custom just feels betterBeamerBob - 9-3-2009 at 09:06 AM
Quote:
Originally posted by PHREERIDER
you're set with those big tires
custom just feels better
Yes, I've always been one to want my stuff to be a little different. I like nice but yes, custom makes it personal.KYTE SLINGER - 9-3-2009 at 10:28 AM
lower brace ..........if your easy on equipment it should be fine for a bit .....but me i was fricking tanking it over every seaweed bed I use as
jumps and going off 2-3foot step downs from the sand dunes scallops on the big foot race buggy.
also foot pegs welds cracked from to much pressure applied by me compressing my body in the buggy.... your set up will bring your riding all year
round, it doesn't matter if you'll have low tide or not if you can build up some power you going to glide over every thing including a Chihuahua or
two if your not carefull:saint:
Oh! your going to want to make a fender for the front... if you ever seen the grinding sheilds fenders I make will work fine and cheap
just spread it out to fit the BF forkBeamerBob - 9-3-2009 at 10:45 AM
Some of the RC plane guys I share a field with (against their will) were buzzing around a little close yesterday. Then they sent out this little RC
truck to "race" with me. It couldn't keep up with me though. At first I thought they were going to just run it right under me. I thought "oh well,
my path is dictated by the wind and very predictable". I might've felt it underneath but I'm not sure. I can't wait to roll right through some soft
sand. This is really going to expand my buggy locations.
So where did you put the gussets on your fork? I don't ever leave the ground or jump so it is probably plenty durable for my zipping back and forth.
Did you have to mod the shield much? How did you attach it? When I first rolled along with the new tires yesterday, little rocks were sticking to
the rubber and slinging up at me. It stopped after getting some dust on the tires. I have my Flexi mudguard that I imagine will still fit about the
same. I'll have to try it and see if it is still effective with the larger tires.KYTE SLINGER - 9-3-2009 at 05:45 PM
bob
face shield kit 13.00- 16.00
one thing about the splash bibs is that they only catch forward... what happen as soon as you turn the wheel? a much wider tire needs better
control ....with the fender no matter were the wheel is pointed controls the spray ...best part especially with BF wheel is that it will keep your
ankles from getting grounded up and great pallet to slap on a few kite stickers or race numbers
Pull off the head band or cut off... next drill 2 small holes in upper most part the the blue plastic just so that both holes clear the race on the
bottom of the head stock {use good zip ties } don't cinch down just yet ..now were you cut the head band away is were the other 2 zip ties go {holes
already there } line up on the fork and zip tie but not cinched down go back to the top zippers pull in the slack then go back the the other
ones... because of the wider fork will spread the shield out will also squish the top of the shield down so you got to work it so it fit nice ..once
everything looks good to you then go ahead a lock it into place ....cut off the zip tails and your done
should take 15.min to install
the clear shield can be painted well
you probably can get by with one under the brace just try to get as much in there to brace both side of the head stock
next you can run the two others on both sides on top of the orig. brace overlapping the one on the bottom like a sandwich making a continuous jointMadKiteBoy - 9-3-2009 at 06:40 PM
Thats aweseome man... i see new mods coming for ours
Flexi bigfoot upgrade
Yeldarb - 18-3-2009 at 02:17 AM
BeamerBob,
I have enjoyed following the development of your hybrid. How did you do the backrest? Is it clamped on or welded? Readymade or fabrication? Adjustable
or fixed?
How well did the kinked downtube fit the brackets of the Flexi siderails?
Also, what was the determining factor for not just buying a Bigfoot buggy? I am mulling over a similar situation and after pricing parts, there is a
point where just buying the whole buggy is more cost effective. How did you get past that?What is wrong with the back end of a PL Bigfoot?BeamerBob - 18-3-2009 at 04:25 AM
Thanks for your interest yeldarb and congratulations on your first post! The backrest is fixed. It is a piece of 1" rigid conduit that was bent to
my specs. I used Kee Klamps to affix it to the buggy rails. Model 10-6 is the right size. There is another type clamp (16-6 I think) that slips
over the side rails instead of the captive model I have. I have to remove the side rails from the axle to remove my backrest brackets. I felt this
clamp was more secure. The other clamp might be better for convenience.
My choice to make the hybrid buggy was multifold. First thing is that I have been at several beaches in the last 3-4 months where my buggy riding was
hampered by soft sand. I wanted the larger tires to widen my frontier when I'm fortunate enough to be buggying on a beach. I'm a big guy at 6'4" and
about 225 lbs (lost about 10 in the kite buggy). I have a 37" waist with slightly larger hips. I don't look like an olympic swimmer but I'm not fat
either. With a harness, I fit a little snug in the PL siderails. I fit great in the Flexi siderails, so they are keepers. The flexi wide axle is
about 3-4 inches longer than the PL bigfoot axle so that helps alleviate some of the raised COG with the taller tires. And I didn't just buy a whole
PL buggy because it would've been quite a bit extra money beyond what I paid for my parts. I would've had 2 buggies but don't really need that right
now. I can convert my current buggy from bigfoot to reg. flexi in about 5 minutes, so I really have it both ways to be able to match the buggy to
best fit conditions. With experience, I'll decide if there are any advantages of the midi tires over the bigfoots but right now I can have it either
way.
The PL downtube matches perfectly with the Flexi side rails. The buggies share some heritage way back in the family tree I think so the 1" hole
spacing and side rail plates must go back to a common ancestor.
The other thing is, I like having things that are custom and different than the rest, and get a kick out of having a buggy that defies branding to
knowing eyes. It was particularly fun to put the Peter Lynn decal on the Flexi wide axle! I'm happy to offer any further insight or answer any more
questions you have.Scudley - 18-3-2009 at 07:12 AM
Quote:
Originally posted by BeamerBob
Do you mean the topmost arch or the support brace underneath?
The support brace underneath is where I have seen cracks and tears in the metal near the welds from use or in one case just really bad welds. Dirt
Slide and I also had cracks where the steering bolt comes through the lower brace.
After six months of really bad wind and a flooded field, I finally bothered to put my buggy back together with my new fork. With triple trees made
from 3/8" cold rolled and fork legs made from 1/4" wall thickness DOM tubing, I think my days of worrying about fork cracks are over.
I did have to reinforce my swan neck with 1/2" angle iron to act as bash plates. That cold rolled flat bar would have sheared the swan neck in just a
few turns.
In the end it cost me double what a PL fork would cost,(had to pay for welding), but this is going last and I can put on big tires.
SBeamerBob - 18-3-2009 at 07:22 AM
Thanks Scudley, I'll keep an eye on those bits for fatigue. Other than me being heavy and riding in fields with some lumpiness here and there, I
don't put much stress on the buggy parts. I never have solid impacts or climb or descend embankments. I probably fit within the design parameters of
the buggies and should get years of use without trouble. But I'll always be watchful of something that seems to be showing weakness.Scudley - 18-3-2009 at 07:31 AM
BB, regardless of what others may have opined, I only get air by mistake. It is not that frequent an occurrence. Our field is not that lumpy. DS
and I are over two hundred pounds, but not that much over. I think the cause of cracking is sliding the front wheel sideways in turns and when
spilling off excess speed, i.e. nothing that a buggy designer should not anticipate. Inspect your fork every outing. I did not think I had a problem
until DS broke the repairs to his fork then I checked mine and found loads of cracks.
SBeamerBob - 18-3-2009 at 08:12 AM
Well, I do tend to slide things around whenever I can get going fast enough! I'll certainly keep an eye on things. I have a few buddies that can
weld if I ever detect stress somewhere.
Flexi bigfoot upgrade
Yeldarb - 18-3-2009 at 11:44 AM
Thank you for going into more detail explaining your thought process, Bob. So, Kee Klamps are key to the BigFlexiPeter or BigFlexiFoot. What a
wonderful world!
My only concern would be the possibility of damaging the siderail with the set screw for the Klamp...or do you use the set screw?vwbrian - 19-3-2009 at 03:25 AM
Beamer Bob
Can you post up some pictures of your back rest setup. Maybe in a new thread to make it easier to find. Or if you have I will do a search
Thanks
BrianBeamerBob - 19-3-2009 at 03:41 AM
I've been emailing pics to those interested but I should just post the jpeg of the cad drawings on the gallery. The Kee Klamps are key to the
backrest only. You could do the backrest or the bigfoot conversion independently. I used a 3/4" PVC pipe union cut in half lengthwise to make a
sleeve to disperse the pressure of the set screw. It probably wouldn't make a difference to just tighten up the screw but I did it anyway. The 16-6
clamp doesn't have a set screw.acampbell - 19-3-2009 at 07:17 AM
I have the same back rest set up on my PL Bigfoot, thanks to Bobby's help. I can't imagine driving without it and hope I can pack it for NABX (iIm
bringing the bigfoot frame with the 16x6.5 wheels) . With the slightly thicker rail diameter of the PL, the PVC shims Bob suggests would not fit, so
my set screws bear up against the steel rails directly. I have seen no troubles though.BeamerBob - 19-3-2009 at 08:42 AM
I had to actually bend the pvc shims to get them between the bracket and the rail. I didn't realize the PL rails were a larger diameter than the
Flexi rails. I'll post the backrest cad plans on the gallery this afternoon.BeamerBob - 19-3-2009 at 01:10 PM
Backrest plans posted in the gallery. It looks white in the thumbnail but is crystal clear when you open it up. Page 2.
Flexifoil Bigfoot Buggy Backrest
Yeldarb - 19-3-2009 at 11:34 PM
Thank you Bob for documenting your modification. That went above and beyond anything I expected and is a testament to the sharing attitude on this
forum. I regret that I have no buggy modifications to share in return because I am sure everyone has already heard about Duct Tape.BeamerBob - 20-3-2009 at 03:56 AM
Quote:
Originally posted by Yeldarb
Thank you Bob for documenting your modification. That went above and beyond anything I expected and is a testament to the sharing attitude on this
forum. I regret that I have no buggy modifications to share in return because I am sure everyone has already heard about Duct Tape.
Yes, yeldarb this is the most selfless and sharing online community I've ever found. You have to look hard to find someone that doesn't have the
community spirit here.
I had to do the cad drawing to bend the tubing for the backrest. The hard part was getting in front of the right computer to post the drawings for
everyone. I must've gotten some karma points. 13-15 mph winds today on my day off.
What's this "duct tape" you speak of? Is it useful for anything? Just heating and AC work it sounds like. :wink2: :duh:
 backrest for Peter Lynn buggy by Musekiter, on Flickr
 backrest for Flexifoil buggy by Musekiter, on Flickr
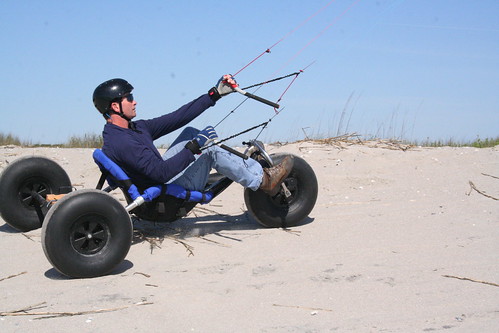 IMG_9617 by Musekiter, on Flickr